Open your PSP this will work in all versions... Im using psp9 here
however some of the newer ones will have the tools in a different place..
What you'll need: Digistamp: Colour Palette : Background Paper
To read about digistamps and how to install PS and AI brushes got to the files pages above or click here
Part One
Open PSP and put your Digistamp and your colour palette on the workspace
Note: make sure you work each step on a new layer as set out and be sure to pay attention to layer moves ...
here we go
Step One
In your Layers palette rename the frame to "BASE"
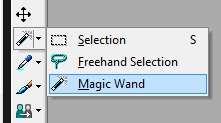
Select your magic wand tool and use these settings

On your frame click inside the 4 outside panels you should see the marching ants
We
want the marching ants to be just over the edges of the black lines so
we wont have any empty spaces later the lines here are quite thick so
Ive set mine at 8 pxls
ADD A NEW LAYER :
On this new layer flood fill your panels with your choice of colour
Go to Effects : 3d Effects : Cutout
Using
the settings below add a darker version of your colour (or you could
use black if you have chosen a dark colour) and click ok
if you think your shadow is not dark enough you can go back and change the shadow colour or just repeat the last step
on your layers palette merge your shadow layer down into your colour layer
then drag the merged layer down under your base layer
Click on your Base Layer
Deselect Selections
Step Two
Select your magic wand tool with the same settings
On your frame click inside the 4 outside Hearts you should see the marching ants
Go to Selections : Modify : Expand : 8 pxls
ADD A NEW LAYER :
On this new layer flood fill your with your choice of colour
ADD A NEW LAYER :
Go to Effects : 3d Effects : Cutout
with the same settings add a shadow of a darker colour than your hearts and click ok
you can change this colour by going back if you dont like it or repeat the step if not dark enough
on your layers palette merge your shadow layer down into your colour layer
then drag the merged layer down under your base layer
Deselect your Selections
so far you should have this
Select your BASE Layer
Select your magic wand tool with the same settings
On your frame click inside the 4 Thin Inside panels you should see the marching ants
ADD A NEW LAYER :
On this new layer flood fill your panels with your choice of colour
Go to Effects : 3d Effects : Cutout
Add a shadow of a darker version of your colour the fill space is smaller here so I lowered the blur to 50%
on your layers palette merge your shadow layer down into your colour layer
then drag the merged layer down under your base layer
Deselect your Selections
Step Four
On your frame click inside the 4 Thick Middle panels you should see the marching ants
copy your paper
Select your BASE Layer
Select your magic wand tool with the same settings
On your frame click inside the 4 Thick Middle panels you should see the marching ants
ADD A NEW LAYER :
Open your backing paper and colourise it to match your frame colours
select your frame and paste the paper into the selection
ADD A NEW LAYER :
Go to Effects : 3d Effects : Cutout
Go to Effects : 3d Effects : Cutout
Add a shadow of a darker version of your paper the space is larger so i upped the blur to 100% (we will darken this later )
On your layers palette merge your shadow layer down into your colour layer
then drag the merged layer down under your base layer
Deselect your Selections
You should have this
If
you like you can merge all your layers now and use your pretty frame
but we are going to add some highlights and make it even prettier now...


No comments:
Post a Comment