
Airbrushing
A very good friend of mine suggested I did a tutorial on this
For you all so here we go
What you’ll need: -
A mask... if you want to use the one im workking on here you can get it here
A tube
PSP
A happy heart
Open your mask and tube in PSP (this will work in any version.
The tools may be in different places but they will be there)
Just a little preparation now so that it’ll turn out right...Lol
If it’s a Black based jpg leave as is…
If it’s a White based jpg then we need to change it to a negative image...
In PSP 9 go to the top menu bar - ADJUST/colour balance / negative image
In PSP 10 go to the top menu bar - IMAGE/ negative image
If it’s a .gif or it has a .pspmask or a .mask at the end then we need to up the colours in the Image
In PSP 9 and 10 go to the top menu bar- IMAGE/increase colour depth and choose the 16 million colours in version 9 or the `rbg 8 bits` in version 10 or hit the shortcut which is ctrl-shift-0 (that’s a zero not a o)
Ok that’s the boring bit out of the way
In the tool palette choose your airbrush
psp 10
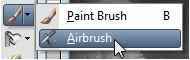
psp 9

Look at the tool options bars and set yours like this (we can play and change this later)
Now choose a colour from your tube or a colour you like in your foreground (that’s the top box in your materials pallete)
On your mask drag your brush over the part you want to colour. Its better to use short strokes and to try and go in the same direction but you can experiment and see what works best for you
Its very light so do it again until you get the depth of colour you like you can always go over it again later, and don’t worry if you go over the lines a bit it looks ok even if you do
If you have very thin lines to paint just turn the size of the brush down
(Remember you have an undo button so if you make a mistake its no biggy
But do save often just in case)
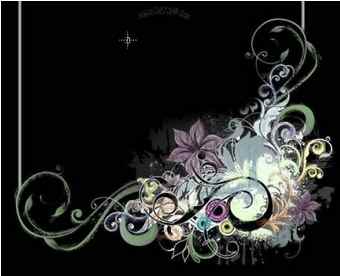
Choose another colour and carry on building up your picture heres mine so far

Try varying the opacity on different parts of the picture
You don’t have to colour in all the parts if you leave some unpainted that looks good too
Once your happy with your painting add your tube and your name and credits
Add a border and there you have it
Heres mine

Now try this on a White image
Try changing the hardness and opacity thickness and density
Try using a custom brush shape
All you need is imagination
I hope you’ve managed to follow this tut and if you have and you’ve enjoyed it
Let me know and if not and you need anything explaining further let me know that too. And if you want to send me your results ill show them on the blog


